Unlocking the Power of Cursor in iOS Development
In recent years, AI has become a big deal in tech, changing the way we work day-to-day. For engineers, it’s now almost essential to use AI tools to stay productive and efficient. Today, I want to talk about Cursor and how it’s made a real difference in my workflow, especially in iOS development, helping me write code faster and debug more easily across platforms.
What is Cursor, and How can it make development easier?Permalink
Cursor AI is an AI-powered code editor built to simplify software development. As a fork from Visual Studio Code (VS Code), it keeps the familiar interface and extensive ecosystem of VS Code, making it an easy switch for developers who already know the platform.
With the integration of OpenAI’s ChatGPT and Claude, Cursor AI brings advanced features like intelligent code suggestions, automatic error detection, and smart code optimization.
Key Features of Cursor
- Autocomplete and Code Prediction: Cursor predicts multi-line edits and adjusts based on recent code changes, helping streamline the development process.
- Inline Code Generation: By pressing
Cmd + K, you can open an inline code generator that lets you enter prompts to generate code directly within your editor. - Reference to Your Codebase: Cursor can refer to specific files or documentation, making its responses more tailored and accurate to your project.
- Multi-AI Model Support: Cursor allows you to choose from multiple AI models, including GPT-3.5, GPT-4, Small Cursor, and Claude. You can also integrate your own API private key for customized AI functionality.
Essential SetupPermalink
Install CursorPermalink
To get started, download Cursor from the official website. The free version includes limited autocompletions and requests, but if you find it useful, you can upgrade to a monthly plan for $20.
Set up iOS development in CursorPermalink
To write iOS code effectively, you’ll need to set up your environment for coding, testing, debugging, and running iOS applications on simulators and physical devices. Fortunately, these requirements are covered with a single extension: Sweetpad. Sweetpad is designed to provide comprehensive iOS development support, including built-in documentation, code completion, debugging tools, and integration with iOS simulators and devices.
Here’s how you can get started:
Step 1: Install the Sweetpad ExtensionPermalink
Open the extensions tab in your editor’s sidebar. Search for “Sweetpad”, then click Install to add it to your workspace.
Step 2: Configure Sweetpad for iOS DevelopmentPermalink
1. Enable Code Completion and Documentation
- Installing Xcode Build Server lets
sourcekit-lspwork outside Xcode, enabling features like symbol navigation, reference lookups, and inline documentation in editors like Cursor. To install it with Homebrew, run:brew install xcode-build-serverYou can also check their repo for other ways to install it.
- Create a
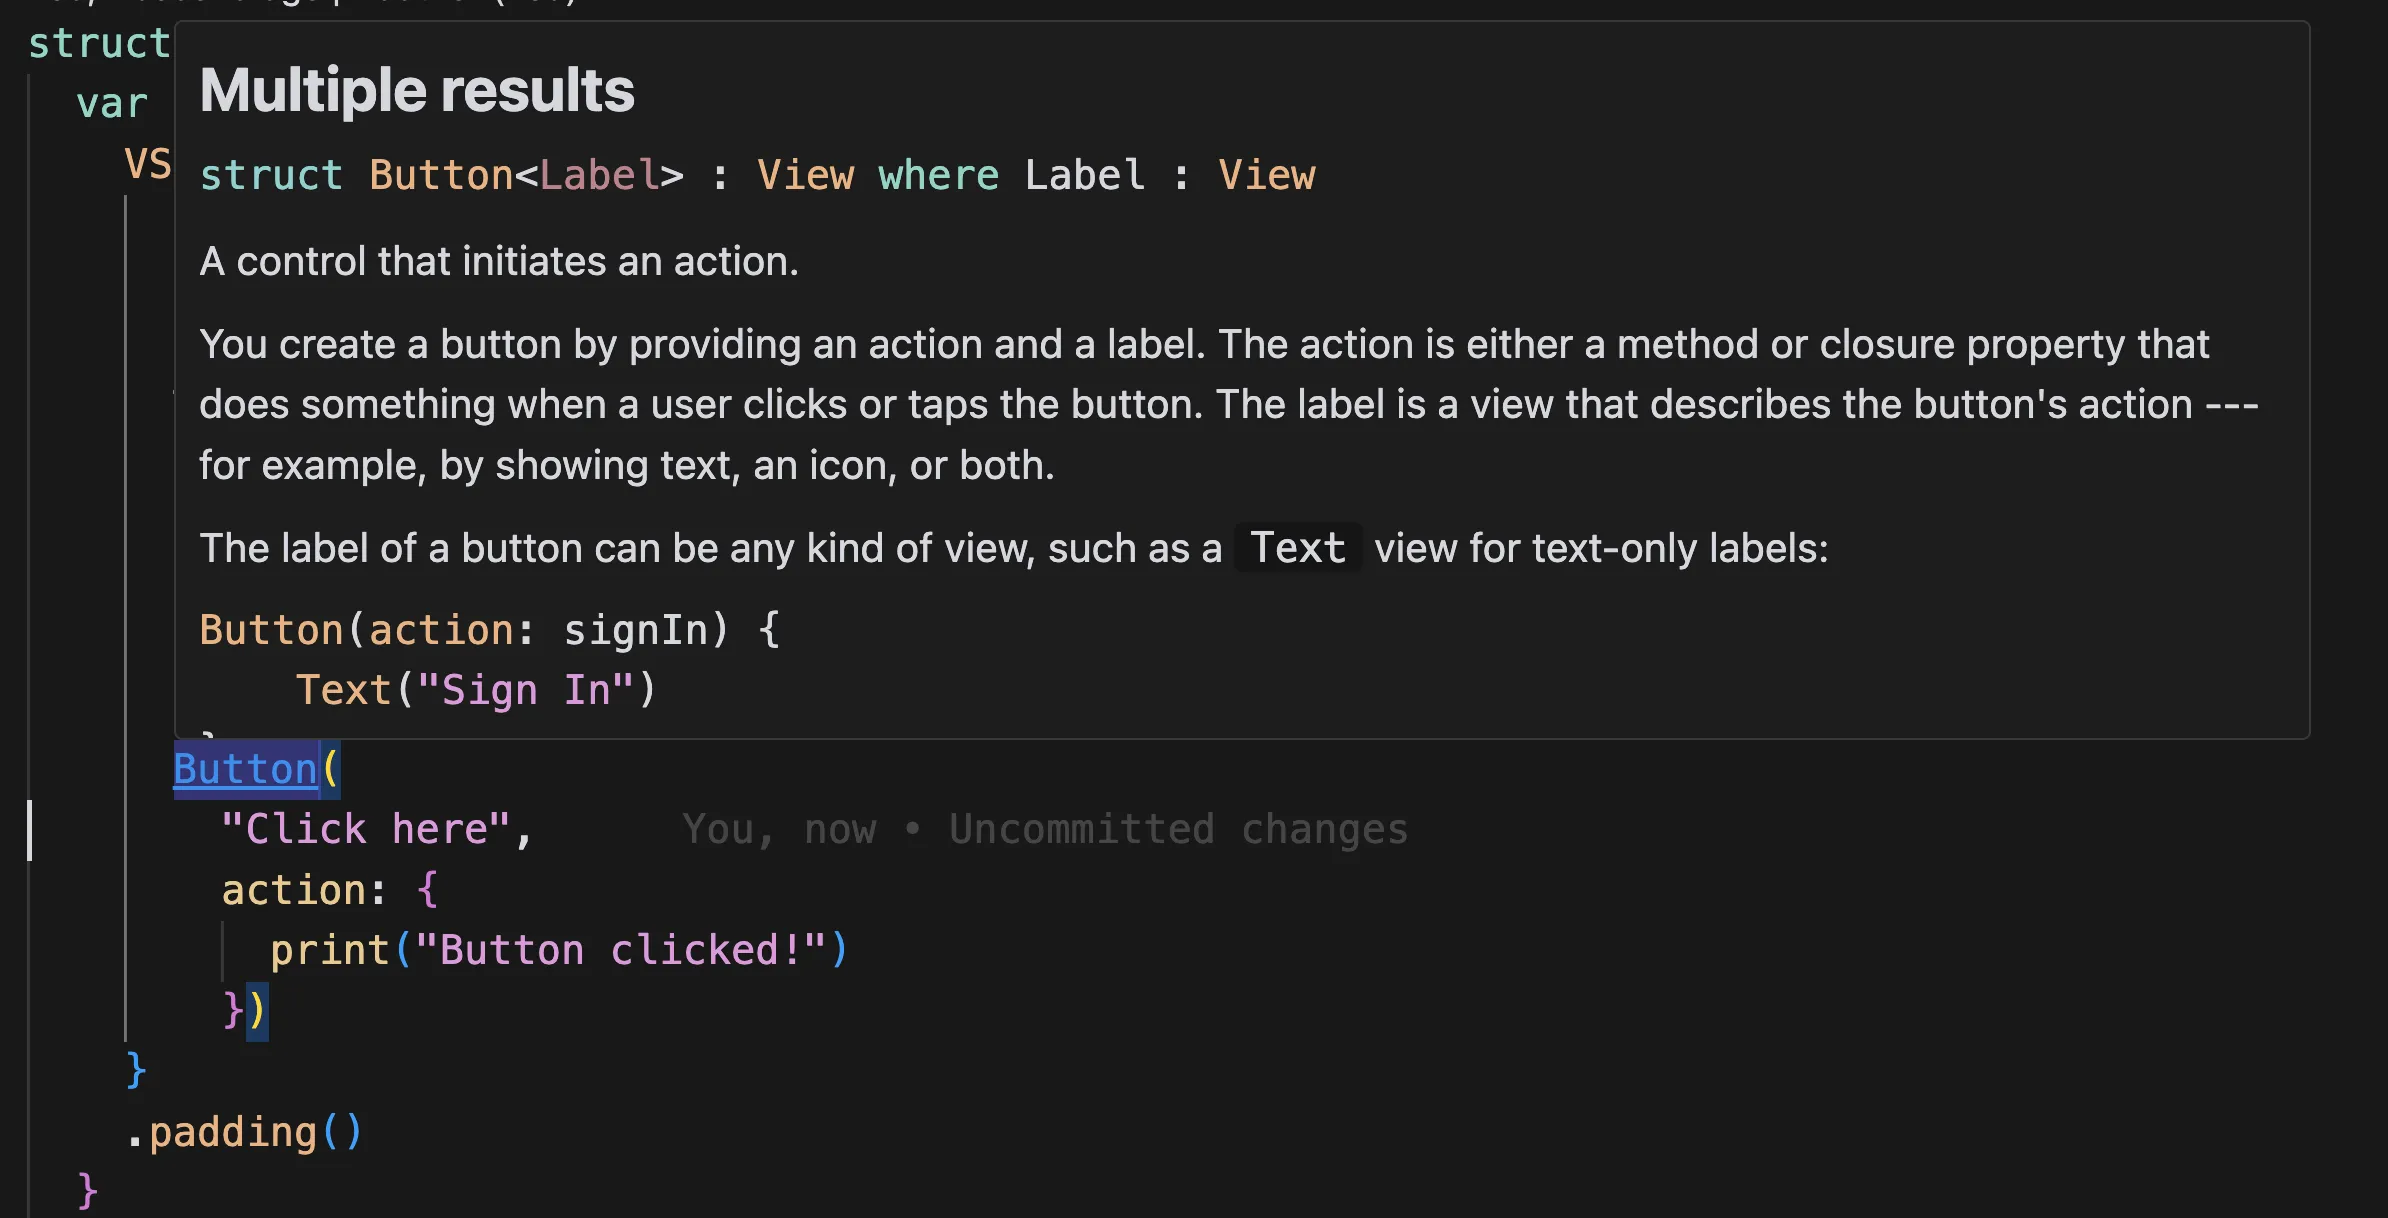
buildServer.jsonconfig file in your project’s root by running the command “SweetPad: Generate Build Server Config” from the command palette. Here’s an example of abuildServer.jsonfile:{ "name": "xcode build server", "version": "0.2", "bspVersion": "2.0", "languages": [ "c", "cpp", "objective-c", "objective-cpp", "swift" ], "argv": [ "/opt/homebrew/bin/xcode-build-server" ], "workspace": "/Users/nhat/Documents/Work/ProjectiOS/VSCodeSwift/VSCodeSwift.xcodeproj/project.xcworkspace", "build_root": "/Users/nhat/Library/Developer/Xcode/DerivedData/VSCodeSwift-azonrxxvrpwqrwhjfgkrdslspgfi", "scheme": "VSCodeSwift", "kind": "xcode" }As a result, you’ll be able to see inline documentation like this:

2. (Optional) Improve xcodebuild output with xcbeautify
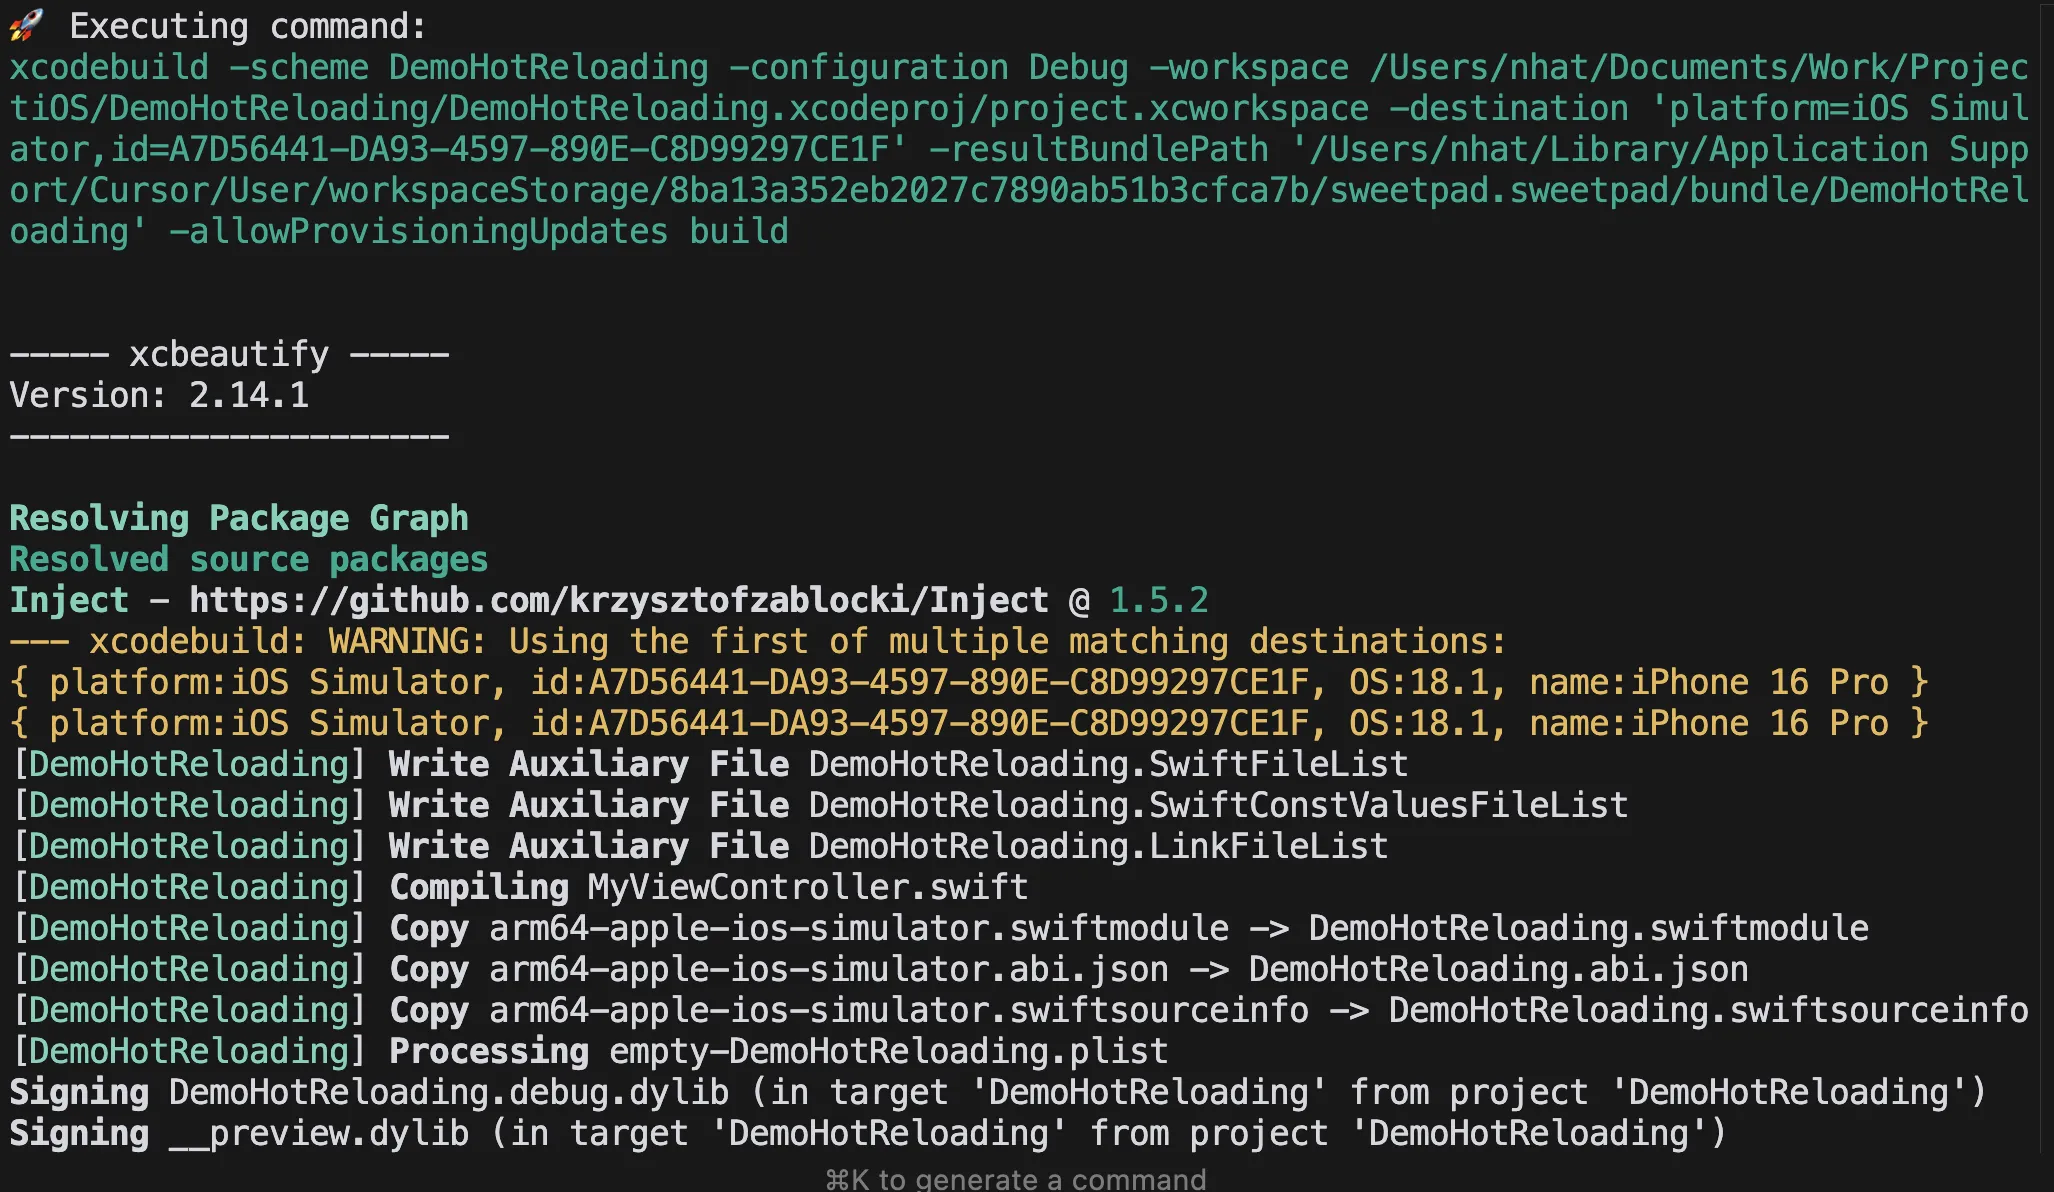
To make your xcodebuild output cleaner and more readable, you can use xcbeautify. It adds color and formatting to the output, making it easier to read. This step is optional, but it’s a nice upgrade if you prefer a more polished look like this.

Just add this settings to .vscode/settings.json, and your code will auto-format every time you hit save!
{
"[swift]": {
"editor.defaultFormatter": "sweetpad.sweetpad",
"editor.formatOnSave": true,
},
}
3. Running and Debugging
Running
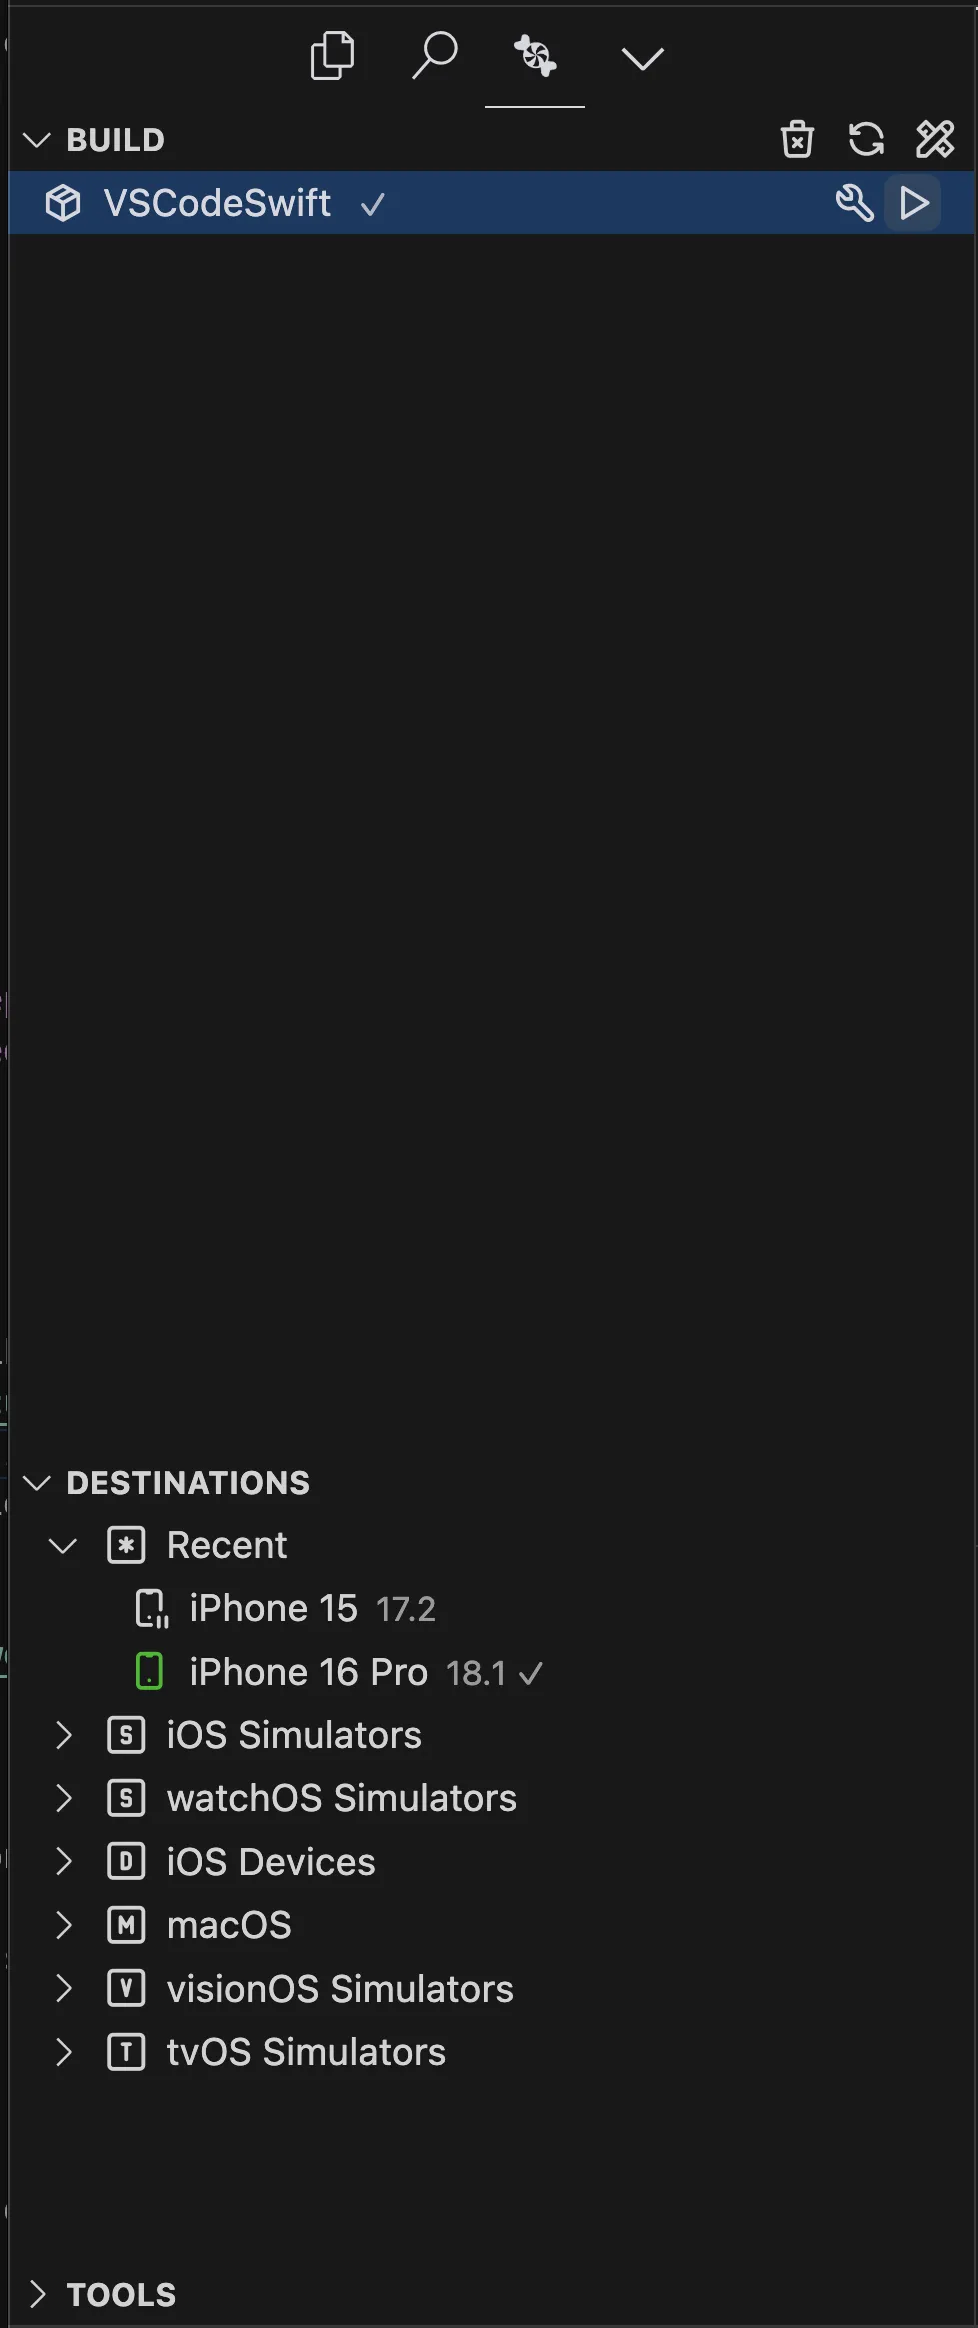
- Open the SweetPad Tools panel on the left.
- Go to the Build section.
- Click the Build & Run button ▶️ next to the scheme name.
- Choose a simulator or device when prompted. SweetPad will then build and launch your app on the selected device.
Debugging
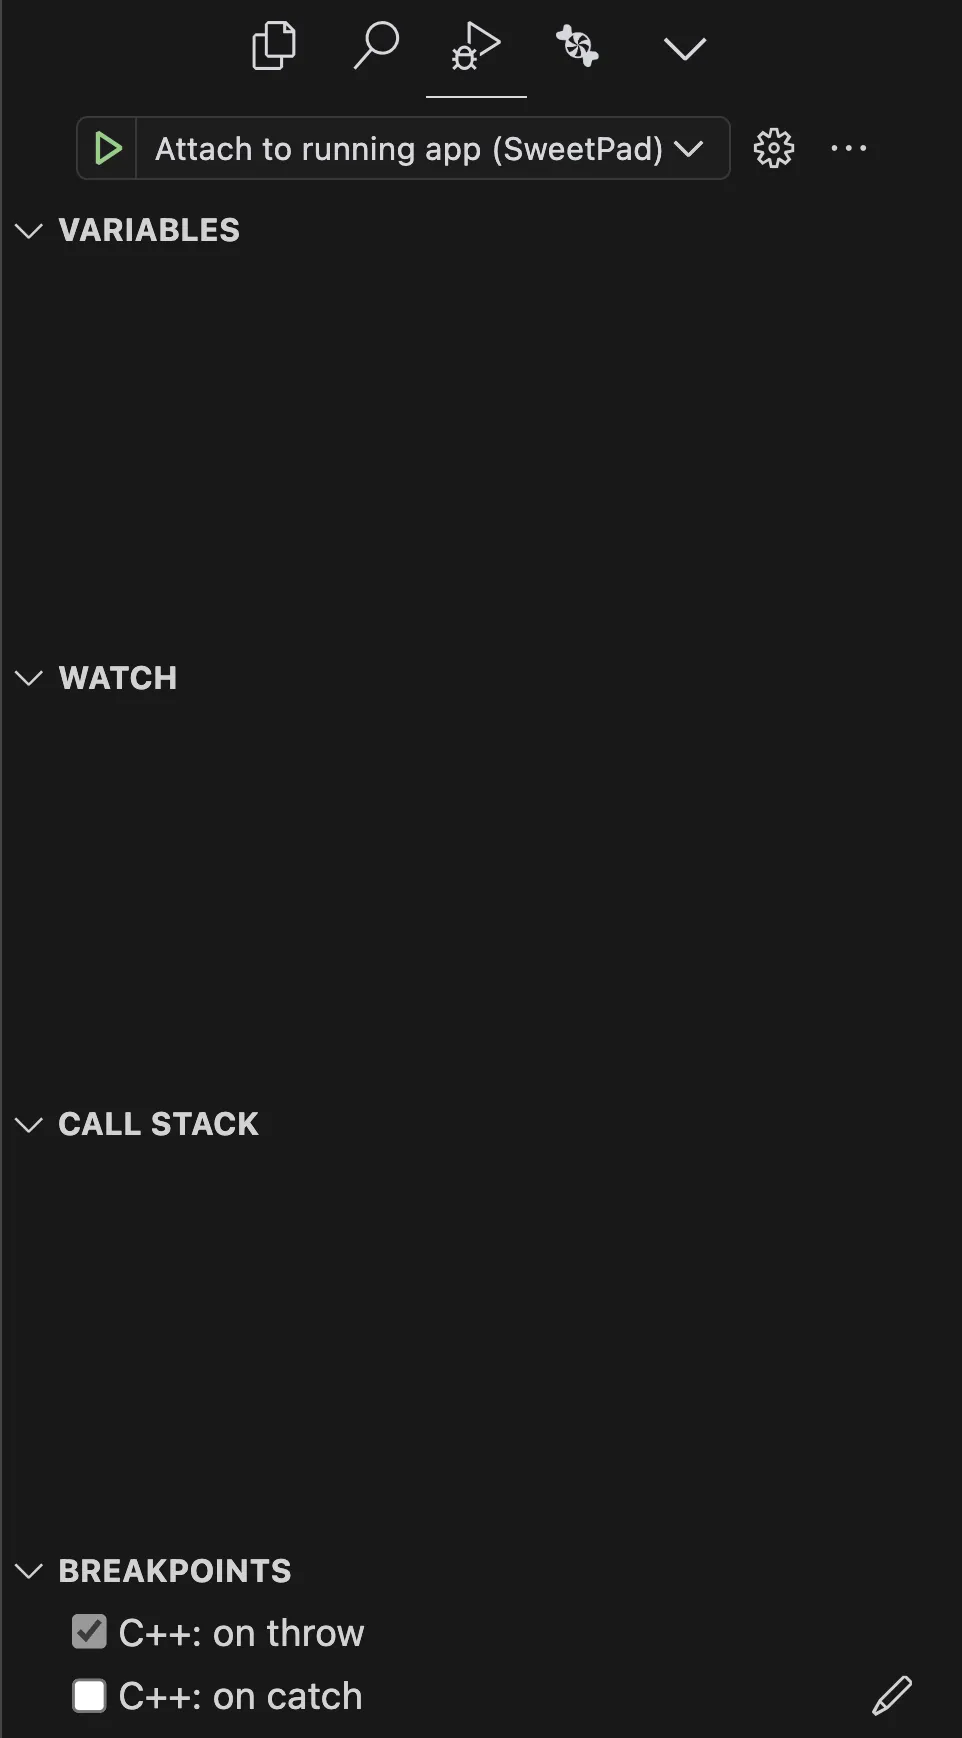
- Open the Run and Debug tab in the Cursor panel.
- Click Create a
launch.jsonand select SweetPad (LLDB) to generate alaunch.jsonfile like this:
{
"version": "0.2.0",
"configurations": [
{
"type": "sweetpad-lldb",
"request": "launch",
"name": "Attach to running app (SweetPad)",
"preLaunchTask": "sweetpad: launch"
}
]
}
Here’s what your panels will look like:


Almost there! Just hit Build & Run to launch the app on your simulator or device and give it a try. If everything’s running smoothly 🎉, let’s dive into some bonus steps to enhance the experience.
Step 3: Complete your iOS Toolbox in CursorPermalink
Now that you can build and run iOS apps in Cursor, there are still a few essential tasks commonly needed for iOS development, like setting up provisioning and certificates, managing dependencies, handling xcodeproj files, and creating iOS-specific files (such as UIViewController or SwiftUI files). For that, there’s great tool called Tuist.
Tuist is a command line tool that leverages project generation to abstract intricacies of Xcode projects, and uses it as a foundation to help teams maintain and optimize their large modular projects. It’s open source and written in Swift.
An alternative option is Xcodegen, which operates differently by letting you manage project configurations through a YAML file.
Let’s dive in and set up Tuist
- Install Tuist
brew install --formula tuist
- Run the following commands to create a new project:
mkdir MyApp cd MyApp tuist init --platform ios
- After initializing, your project folder will look like this:
MyApp/ ├── Derived/ ├── Tuist/ │ ├── Config.swift │ └── Package.swift |── Project.swift └── MyApp/
Now that you’ve finished creating an iOS project with Tuist, take some time to get familiar with the main commands and learn a bit how Tuist works.
To create an Xcode project, run:
tuist generate
To edit the configuration, run:
tuist edit
These steps are integrated into SweetPad, so you can also open the Command Palette to run these commands directly.
Time for a new addition—let’s bring a dependency into the project!
- Use the
tuist editcommand to open the project manifest. - In
Package.swift, add the dependency like this:dependencies: [ // Add your own dependencies here: .package(url: "https://github.com/dependency-repo-name", from: "1.0.0"), ] - Link it to a target
let project = Project( name: "MyApp", targets: [ ... dependencies: [ .external(name: "DependencyName") ], ... ] ) - Run
tuist generateto update and view the new dependency in the project
It’s not too hard, right? We can also add code signing by modifying Project.swift like this:
let project = Project(
name: "MyApp",
targets: [
...
settings: .settings(base: [
"CODE_SIGN_STYLE": "Manual",
"DEVELOPMENT_TEAM": "Your Team ID",
"PROVISIONING_PROFILE": "Your provisioning profile",
]),
...
]
)
You can explore many more great features of Tuist on their website.
A tip for Xcode to Tuist migration: leverage xcdiff to compare your original project with the Tuist-generated one and identify any inconsistencies.
Here’s a last tip: to create iOS-specific files without Xcode, you can use my tasks.json. Simply place it in your .vscode folder. This setup includes commands to automate creating iOS files, so you don’t have to do it manually!
| { | |
| "version": "2.0.0", | |
| "tasks": [ | |
| { | |
| "label": "Create SwiftUI File", | |
| "type": "shell", | |
| "command": "echo 'import SwiftUI\n\nstruct '\"${input:swiftuiFileName}\"': View {\n var body: some View {\n Text(\"Hello, SwiftUI!\")\n }\n}\n\n#Preview {\n '\"${input:swiftuiFileName}\"'()\n}' > ${workspaceFolder}/${workspaceFolderBasename}/\"${input:swiftuiFileName}\".swift", | |
| "args": [], | |
| "problemMatcher": [], | |
| "presentation": { | |
| "echo": true, | |
| "reveal": "always", | |
| "focus": false, | |
| "panel": "shared" | |
| } | |
| }, | |
| { | |
| "label": "Create UIViewController File", | |
| "type": "shell", | |
| "command": "echo 'import UIKit\n\nclass '\"${input:uiviewcontrollerFileName}\"': UIViewController {\n\n override func viewDidLoad() {\n super.viewDidLoad()\n // Additional setup after loading the view.\n }\n}' > ${workspaceFolder}/${workspaceFolderBasename}/\"${input:uiviewcontrollerFileName}\".swift", | |
| "args": [], | |
| "problemMatcher": [], | |
| "presentation": { | |
| "echo": true, | |
| "reveal": "always", | |
| "focus": false, | |
| "panel": "shared" | |
| } | |
| }, | |
| { | |
| "label": "Create Swift Class or Struct File", | |
| "type": "shell", | |
| "command": "echo 'import Foundation\n\n${input:swiftStructOrClass} '\"${input:swiftClassFileName}\"' {\n // Your code here\n}' > ${workspaceFolder}/${workspaceFolderBasename}/\"${input:swiftClassFileName}\".swift", | |
| "args": [], | |
| "problemMatcher": [], | |
| "presentation": { | |
| "echo": true, | |
| "reveal": "always", | |
| "focus": false, | |
| "panel": "shared" | |
| } | |
| }, | |
| { | |
| "label": "Create Unit Test File", | |
| "type": "shell", | |
| "command": "echo 'import XCTest\n@testable import ${workspaceFolderBasename}\n\nclass ${input:unitTestFileName}Tests: XCTestCase {\n\n override func setUpWithError() throws {\n // Setup code here.\n }\n\n override func tearDownWithError() throws {\n // Teardown code here.\n }\n\n func testExample() throws {\n // Example test case\n XCTAssert(true)\n }\n\n func testPerformanceExample() throws {\n self.measure {\n // Code to measure performance\n }\n }\n}' > ${workspaceFolder}/${workspaceFolderBasename}Tests/${input:unitTestFileName}.swift", | |
| "args": [], | |
| "problemMatcher": [], | |
| "presentation": { | |
| "echo": true, | |
| "reveal": "always", | |
| "focus": false, | |
| "panel": "shared" | |
| } | |
| } | |
| ], | |
| "inputs": [ | |
| { | |
| "id": "swiftuiFileName", | |
| "type": "promptString", | |
| "description": "Enter the SwiftUI file name (without .swift)" | |
| }, | |
| { | |
| "id": "uiviewcontrollerFileName", | |
| "type": "promptString", | |
| "description": "Enter the UIViewController file name (without .swift)" | |
| }, | |
| { | |
| "id": "swiftClassFileName", | |
| "type": "promptString", | |
| "description": "Enter the Swift class or struct file name (without .swift)" | |
| }, | |
| { | |
| "id": "swiftStructOrClass", | |
| "type": "pickString", | |
| "description": "Choose struct or class", | |
| "options": [ | |
| "struct", | |
| "class" | |
| ] | |
| }, | |
| { | |
| "id": "unitTestFileName", | |
| "type": "promptString", | |
| "description": "Enter the Unit Test file name (without .swift)" | |
| } | |
| ] | |
| } |
Here’s how to use it: Open the Command Palette, type Task: Run Task, select it, and choose your desired task from the list.

Files are initially created in the root directory of your folder. You’ll need to move them to the folder you want.
Finally, Sweetpad also supports an extension to automatically regenerate the Xcode project whenever you create or delete a .swift file.
To enable it, simply add this configuration to your settings.json file:
{
"sweetpad.tuist.watcher": true
}
ConclusionPermalink
I hope this article gave you a helpful look at using Cursor in iOS development and maybe even inspired you to give it a try. After many years of working in Xcode, it’s exciting to explore new tools that bring fresh ways to code. With the support of AI, tools like Cursor can help make our daily work easier and more efficient.
If you’re interested in hot reloading and how to make the most of it in VSCode/Cursor, take a look at my article below!
Hot Reloading with Inject for UIKit & SwiftUI
Thank you for reading, and happy coding!
Like what you're reading?
If this article hit the spot, why not subscribe to the weekly newsletter?
Every weekend, you'll get a short and sweet summary of the latest posts and tips—free and easy, no strings
attached!
You can unsubscribe anytime.